
Before you begin
- You must be an Organization Administrator to add a client
- Ensure you have the client’s basic identity and demographic information available
- Some fields are required for HMIS or VOCA reporting compliance, but all users are encouraged to fill these fields.
How to add a client
Step 1: Navigate to Clients
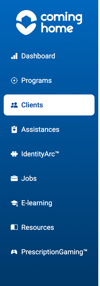
- Go to the left-hand sidebar
- Click on “Clients”
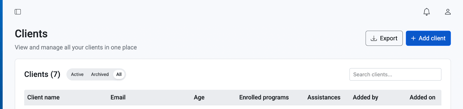
Step 2: Complete Core Identity
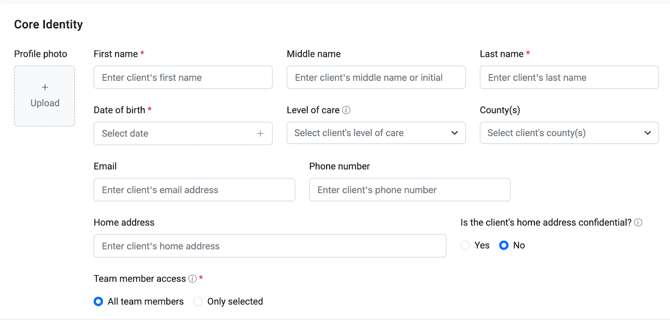
The Core Identity section captures the essential personal, contact, and access information for each client. This information forms the foundation of the client profile and is used across case management, reporting, and service delivery.
-
Profile Photo: Allows you to upload a photo for the client. This helps staff quickly recognize and confirm the correct profile, especially in organizations managing large caseloads. Uploading a photo is optional.
-
First Name (Required): The client’s legal or preferred first name.
-
Middle Name: The client’s middle name or initial, if applicable. This field is optional.
-
Last Name (Required): The client’s legal or preferred last name.
-
Date of Birth (Required): The client’s date of birth. This information is used for identification, eligibility checks, and age-based reporting.
-
Level of Care: Indicates the level of support or care the client is receiving (for example, Urgent, primary, Preventative, Sustainable). This helps teams prioritise cases and segment clients for service delivery and reporting.
-
County(s): The county or counties associated with the client. This is commonly used for geographic reporting, funding requirements, and understanding service coverage.
-
Email: The client’s email address. This can be used for communication, notifications, or portal access where applicable.
-
Phone Number: The client’s primary contact phone number.
- Home Address: The client’s home address. This information may be used for outreach, service coordination, or reporting requirements.
- Is the client’s home address confidential?: Indicates whether the client’s home address should be treated as confidential.
- Yes: The address will be restricted to authorized users only.
- No: The address will be visible according to standard access permissions.
- Is the client’s home address confidential?: Indicates whether the client’s home address should be treated as confidential.
- Team Member Access (Required): Controls which staff members can view and work with the client’s profile.
- All team members: The client record is visible to everyone on the team.
- Only selected: Access is limited to specific team members chosen by an administrator.
Organization Administrators are the only ones who can assign team member access to other members within the system. Assigning another team member or account will only function if there are already other team member accounts in the system.
Step 3: Complete Demographics
The Demographics section captures key identity, language, and accessibility information about the client. This data supports equitable service delivery, compliance with reporting requirements, and a better understanding of who is being served.
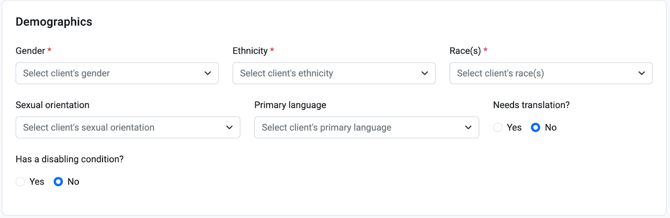
All information should be entered based on client self-identification whenever possible.
-
Gender (Required): The client’s self-identified gender. This field supports inclusive service provision and demographic reporting.
-
Ethnicity (Required): The client’s ethnicity, used for grant reporting, compliance, and understanding service reach across different communities.
-
Race(s) (Required): The client’s self-identified race or races. Multiple selections may be available where applicable. This data is critical for accurate demographic analysis and reporting.
-
Sexual Orientation: The client’s self-identified sexual orientation. This field is optional and should only be completed if the client is comfortable sharing this information.
-
Primary Language: The main language spoken by the client. This helps teams plan communication, service delivery, and language access needs.
-
Needs Translation?: Indicates whether the client requires translation or interpretation services.
- Yes: Translation support is required for effective communication.
- No: Translation support is not required.
-
Has a Disabling Condition?Indicates whether the client has any disabling condition that may impact service delivery.
-
Yes: Additional disability-related fields will appear.
-
No: No further disability information is required.
-
Disability & Health Information
If Yes is selected for “Has a disabling condition?”, you may record the following as applicable. These fields help ensure appropriate accommodations and support are provided.
- Physical Disability: Indicates whether the client has a physical disability that affects mobility or physical functioning.
- Developmental Disability: Indicates whether the client has a developmental disability that may affect learning, communication, or daily functioning.
- Chronic Health Condition: Indicates whether the client has a long-term health condition requiring ongoing management or accommodation.
- HIV/AIDS: Indicates whether the client has an HIV/AIDS diagnosis. This information is collected for reporting and service coordination purposes and should be handled with strict confidentiality.
- Mental Health Disorder: Indicates whether the client has a diagnosed mental health condition that may impact care planning or support needs.
- Substance Use Disorder: Indicates whether the client has a substance use disorder. This information supports appropriate referrals, service planning, and reporting.
Step 4: Complete HMIS Fields (if applicable)
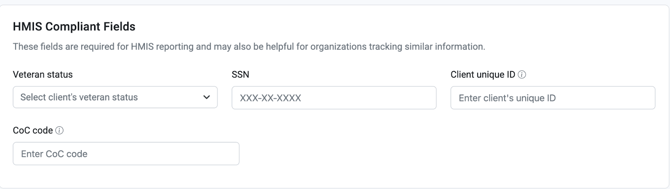
These fields are required for HMIS compliance and may also support other reporting frameworks.
While some information may feel sensitive, we still strongly encourage completing these fields whenever possible, as they are critical for accurate reporting, data matching, and demonstrating impact to funders. Accurate completion of these fields ensures clean reports, reduces data errors, and supports continued funding and compliance.
-
HMIS Compliant Fields: The HMIS Compliant Fields section contains information required for Homeless Management Information System (HMIS) reporting. These fields support federal, state, and funder reporting requirements and help ensure data consistency across systems.
-
Veteran Status: Indicates whether the client has served in the U.S. Armed Forces. This field is required for HMIS reporting and is used to determine eligibility for veteran-specific programs and services.
-
Social Security Number (SSN): The client’s Social Security Number, entered in the standard format (XXX-XX-XXXX). This field is used for HMIS data matching, deduplication, and reporting purposes. Access to this information should be restricted according to your organization’s privacy and security policies.
If the client does not wish to provide their SSN, follow your organization’s HMIS guidance for acceptable alternatives.
-
Client Unique ID: A system-specific or organization-specific identifier used to uniquely identify the client. This can be helpful for cross-system tracking, integrations, or internal reporting.
-
CoC Code (Continuum of Care Code): The Continuum of Care (CoC) code associated with the client. This code identifies the geographic area responsible for HMIS reporting and is required for accurate federal and HUD reporting.
Step 5: Complete VOCA Fields
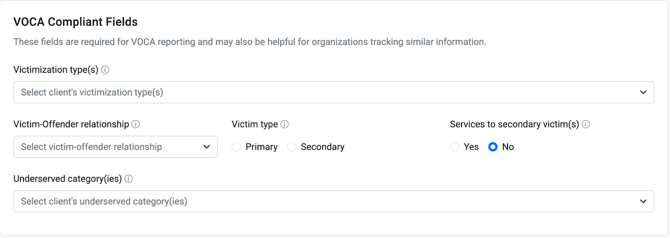
This field supports VOCA reporting, but we encourage all users to complete it, including organizations that are not VOCA grantees.
The VOCA Compliant Fields section captures information required for Victims of Crime Act (VOCA) reporting. These fields help organizations meet federal and state reporting requirements, demonstrate service reach, and ensure continued funding.
Because this information can be sensitive, it should always be collected respectfully, with client consent, and using trauma-informed practices.
-
Victimization Type(s): Identifies the type or types of victimization/trauma experienced by the client. Multiple selections may be available. This field is required for VOCA reporting and is used to understand the nature of services provided and populations served.
-
Victim–Offender Relationship: Indicates the relationship between the victim and the offender, where known. This information supports accurate reporting and helps contextualize the client’s experience.
-
Victim Type Indicates whether the client is a:
-
Primary victim: The individual who directly experienced the crime.
Secondary victim: An individual indirectly affected (for example, a family member or caregiver).
-
Services to Secondary Victim(s): Indicates whether services were provided to secondary victims related to this case.
-
Yes: Services were provided to secondary victims.
- No: Services were not provided to secondary victims.
-
Underserved Category(ies)
The Underserved Category(ies) field identifies whether a client belongs to one or more populations that are historically underserved or face additional barriers to accessing services.
Selecting these categories helps organizations:
- Meet VOCA reporting requirements
- Demonstrate equitable service delivery
- Better understand and respond to client needs
- Support continued funding and program evaluation
Clients may fall into more than one category, and multiple selections can be made where applicable. Available categories include:
- Deaf / Hard of Hearing – Clients who experience partial or complete hearing loss.
- Limited English Proficiency – Clients who have limited ability to read, speak, write, or understand English.
Homeless – Clients who are currently experiencing homelessness or housing instability. - Residents of Rural Areas – Clients who live in rural or geographically isolated communities with limited access to services.
Immigrants / Refugees / Asylum Seekers – Clients who have immigrated, sought asylum, or hold refugee status. - Veterans – Clients who have served in the U.S. Armed Forces.
- LGBTQ – Clients who identify as lesbian, gay, bisexual, transgender, queer, or other diverse sexual orientations or gender identities.
- Victims with Disabilities (Other than Deaf/Hard of Hearing) – Clients with physical, developmental, or other disabilities that create additional barriers to accessing services.
Step 6: Add Referral Information
The Referral Information section captures details about how a client was referred to your organization. This information helps teams track referral pathways, monitor follow-up actions, and understand which partners or sources are connecting clients to services.
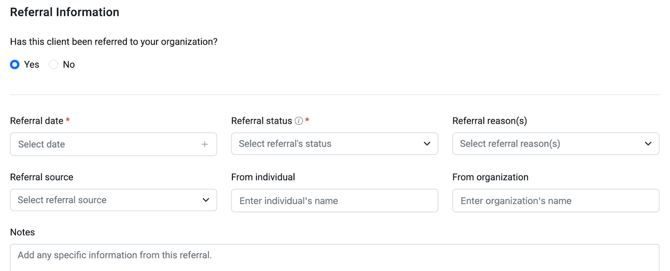
- Has this client been referred to your organisation?:Indicates whether the client came to your organization through a referral.
- Yes: Complete the referral details below.
- No: No referral information is required.
- Referral Date (Required):The date the referral was received. This helps track timelines, response times, and service initiation.
- Referral Status (Required)The current status of the referral (for example, Initiated, completed, connected, did not connect). This field is used to track referral progress and ensure appropriate follow-up.
- Reason(s): The reason or reasons the referral was made. Multiple selections may be available. This helps clarify client needs and supports reporting and service planning.
- Referral Source: Indicates where the referral originated (for example, self-referral, law enforcement, healthcare provider, school, or community organization).
- From Individual: If the referral came from an individual, enter the person’s name here (if appropriate).
- From Organization: If the referral came from an organisation, enter the organisation’s name here.
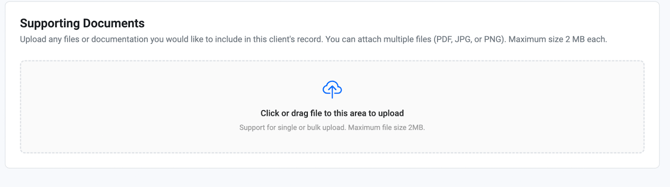
Step 7: Upload supporting documents (optional)
Add any relevant files or documentation to the client profile
Step 8: Save the client
- Click “Create Client”
- Return to the Clients dashboard to confirm the profile was created

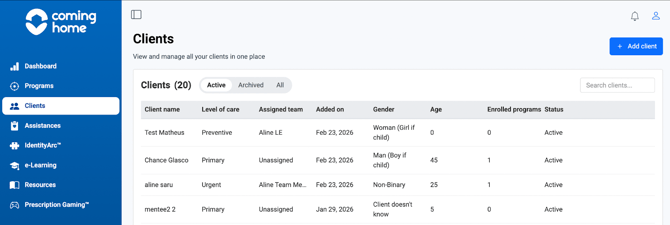
Result:
A new client profile is created and can now be used across programs, services, assessments, Identity Arc, and reporting.
Tips / Best Practices
- Use the "Only selected" option for sensitive cases or when managing large organizations to prevent staff from being overwhelmed by clients they are not actively supporting.
- Remember that assigning a team member only works if their account already exists in the system. If you need to assign a new employee, create their user account first in Settings.
- Regularly review team member assignments on existing clients, especially when staff roles change or when they leave the organization.
Related Articles
- How to Navigate the Platform
- Understanding User Roles and Permissions
- Overview of the Client Toolkit
Need more help?
If you are unable to add a client or need access, contact your Organization Administrator.