
Who can use this feature
- Organization Administrators: Can add, duplicate, view, edit, archive, and unarchive assistances.
- Team Members: Can add, duplicate, and view assistances. Can edit assistances they created. Cannot archive or unarchive.
- Interns / Volunteers: Can add, duplicate, and view assistances. Can edit assistances they created. Cannot archive or unarchive.
- Law Enforcement / Advocates: Can add, duplicate, and view assistances for their assigned clients. Can edit assistances they created. Cannot archive or unarchive.
Before you begin
Step-by-step instructions
Step 1: Navigate to Clients
1. From the main sidebar, select Clients.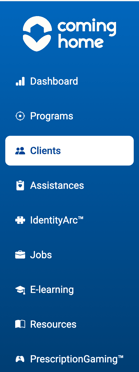

3. Click the client name to open the client profile.
Step 2: Open the Assistances Tab
Inside the client profile:
- Select the Assistances tab.
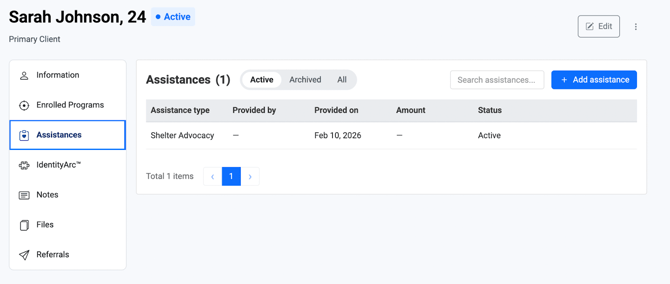
Displayed columns include:
- Assistance Type
- Provided by
- Provided On
- Amount
- Status
Step 3: Add a New Assistance
- Click Add assistance.
- The Add Assistance modal will open.
Step 4: Complete Assistance Details
Within the Details section:
Users will record the core information related to the assistance being delivered.
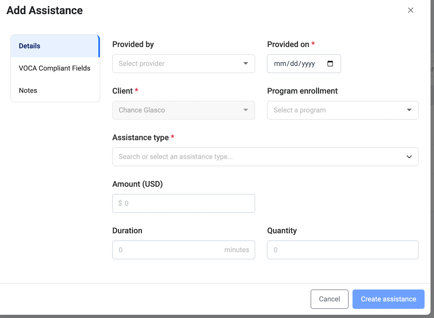
Required fields include:
- Provided by: Identifies who delivered or recorded the assistance.
- Provided on (required)
Record the date the assistance was delivered. - Client
The client receiving the assistance (automatically pre-selected when adding from the client profile). - Program
Optional program association. Users may select a program if the assistance is connected to a specific service program. - Category
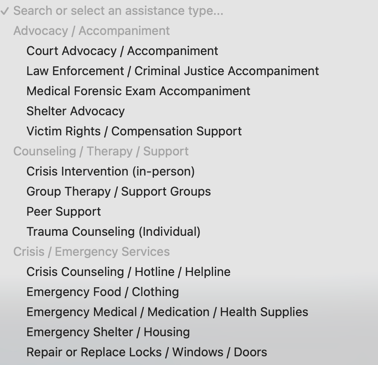
Select the main assistance category. - Assistance Type
Select the specific type of assistance within the existing options of assistnaces.
- Amount (USD)
Enter any financial value associated with the assistance provided. - Quantity
Used to track counts or units of service delivered. - Duration
Record the time spent delivering the assistance (in minutes).
These fields allow organizations to capture standardized measurable service data, including:
- Financial assistance values
- Service duration
- Quantitative outputs
- Categorized service delivery.
Step 5: VOCA Reporting Fields Overview
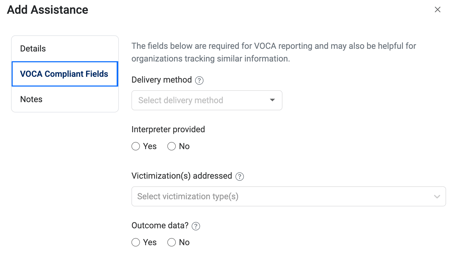
The VOCA Reporting Fields section allows organizations to capture additional data required for Victims of Crime Act (VOCA) reporting and similar grant-based compliance frameworks.
These fields help standardize how assistances are documented, ensuring that organizations can generate accurate reports, track service delivery methods, and measure outcomes aligned with funding requirements.
Even for organizations not using VOCA, these fields can support structured service tracking and outcome evaluation.
VOCA Fields Explained
- Delivery Method
Defines how the assistance was delivered (e.g., in-person, virtual, phone, etc.). - Interpreter Provided
Indicates whether interpretation services were required during service delivery. - Victimization(s) Addressed
Specifies the type(s) of victimization the assistance addressed. - Outcome Collected
Indicates whether an outcome was tracked for this assistance.
If Yes:
- Outcome Type (example: Safety Planning, Protection Order)
- Outcome Result describing the result achieved.
Step 6: Notes
- Navigate to the Notes section within the Add Assistance modal.
- Use this area to include contextual information related to the service, including:
- Observations
- Client updates
- Service context
- Follow-up requirements
Notes support qualitative tracking alongside quantitative service data.
Step 7: Save the Assistance
- Review all fields for accuracy.
- Click Create assistance to finalize and save.
The assistance will now appear within the Client-level Assistances table and will contribute to program reporting metrics.
Result
Tips / Best Practices
- Always record the Duration or Amount when applicable, as this quantitative data is critical for grant reporting and demonstrating organizational impact.
- Use the Notes section to capture qualitative details that numbers cannot show, such as client progress during a counseling session or specific challenges discussed.
- If a service is strictly tied to a program, ensure you select that program from the dropdown menu in step 3 so the data correctly attributes to your program-level reporting.