
Purpose
Manage user access across your organisation by adding new team members, updating user information, and removing access when needed.
Proper user management ensures:
- Secure and controlled system access
- Accurate role-based permissions
- Clean and up-to-date organizational records
Who Can Use This Feature
- Organization Administrators: Full access
- Team Members / Interns / Advocates: No access
Only authorized administrators can manage user accounts to ensure data security and consistency.
When to Use This Feature
Use this feature when you need to:
- Add a new team member to the platform
- Update user details (name, email, role, etc.)
- Remove access for a user who no longer needs it
1. How To Add an Organization User
Step 1: Go to Settings
- From the left sidebar, click Settings.


Step 2: Open the Add Team Member Form
- Click + Add organization user

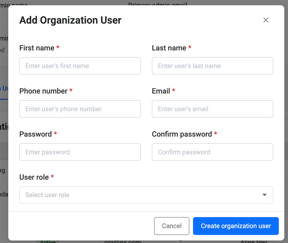
Step 3: Enter User Information
Complete all required fields:
- First name: Enter the team member’s first name.
- Last name: Enter the team member’s last name.
- Phone number: Enter their contact number.
- Email: Enter a valid email address (this will be used for login).
Step 4: Create Login Credentials
- Password: Create a secure password for the user.
- Confirm password: Re-enter the password to confirm.
Step 5: Assign User Role
Under User role, select the appropriate role based on the level of access the user needs:
- Organization Administrator
- Team Member
- Intern / Volunteer
- LE / Advocate
Choose the role carefully, as it determines permissions and system access.
Step 6: Save the User
- Click Create organization user.
- The new user will appear in the Organization Users list.
Step 7: Confirm
Check the Organization Users table to ensure the user was successfully added.
What Happens Next
- The user can log in using the credentials provided
- Their role determines what they can view and manage
- They will begin appearing across relevant workflows (clients, programs, etc.)
Important Notes
- Only Organization Admins can add new Organization Users.
- Team Members, Interns/Volunteers, and LE/Advocates cannot add users.
2. How To Edit an Organization User
Edit or Archive an Organization User
You can update an organization user’s information or archive their account directly from the Organization Users table in Settings.
How to Edit an Organization User
Editing allows you to update user details such as name, contact information, or role.
Steps:
- Go to Settings from the left sidebar.
- Navigate to the Organization Users section.
- Locate the user you want to update in the list.
- Click the Edit icon next to their name.

- Update the required fields (for example: name, email, phone number, or role).
- Save your changes.
Changes will take effect immediately after saving.
3. How to Archive an Organization User
Archiving removes a user’s active access without permanently deleting their information. This is recommended when a staff member leaves or no longer needs system access.
Steps:
- Go to Settings > Organization Users
- Find the user you want to archive.
- Click the Archive icon next to their name.
- Confirm the action when prompted.

Archived users will:
- No longer be able to log into the platform.
- Remain stored for historical records and reporting.
Viewing Archived Users
- Use the filter options at the top of the Organization Users table.
- Select Archived to view archived users.
- You may restore access later if needed (depending on permissions).
Related Articles
- Understanding User Roles and Permissions
- How to Log In and Access Your Account
- Organization Settings Overview
Need More Help?
If you cannot update a field, contact the Coming Home Support Team for additional help.