
What this feature does
Assigning a Goal within Identity Arc enables service providers to define short-term milestones that break down long-term Challenges into achievable and client-centered progress steps. Goals act as a roadmap toward long-term outcomes, helping translate high-level aspirations into structured and measurable actions.
Ideally, each Goal connects directly to an active Challenge, ensuring that all client activities contribute to meaningful and sustained progress. Once assigned, Goals guide engagement, reinforce momentum, and provide clear indicators of advancement along the client’s healing or development journey.
Who can use this feature
- Organization Administrators – Can assign, edit, archive, and monitor Goals.
- Team Members – Can assign and manage Goals for clients assigned to them.
- Interns / Volunteers – May assign Goals depending on organizational permissions.
- Law Enforcement / Advocates – No Access to IdentityArc.
- Clients – Can view assigned Goals through the client-facing mobile app, promoting engagement and accountability.
Before you begin
Before assigning a Goal, ensure that:
- The client has been created in the system.
- You have access to the Identity Arc feature.
- The Identity Arc library (Challenges, Goals, and Tasks) has been configured within your organization.
- An active Challenge exists for the client (recommended for alignment, though not strictly required).
How to assign a Goal to a client
Step 1: Navigate to the client profile
- From the left-hand sidebar, click Clients.

- Select the client to whom you want to assign the Goal.
- Open the Client Toolkit.
Step 2: Access Identity Arc
- Within the client profile, click on the IdentityArc tab.
- The IdentityArc Assignments Dashboard will display all existing Challenges, Goals, and Tasks for the client.
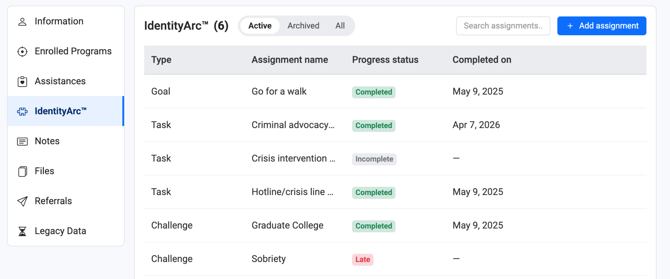
Step 3: Add a new assignment
- Click + Add Assignment.
- In the assignment modal, select Goal as the assignment type.

Step 4: Select the Goal
- Choose the desired Goal from the dropdown menu populated from your organization’s Identity Arc library.
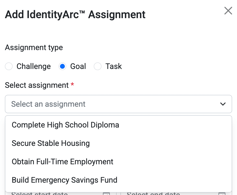
- Ensure the selected Goal aligns with the client’s active Challenge whenever possible.
Step 5: Define the timeline
- Start Date: Select the date when the Goal becomes active.

- End Date (Optional): Leave this field blank if the Goal is ongoing or does not have a fixed completion date.
Step 6: Add a note for the client
If your clients have access to the mobile app, you can include a supportive note to encourage incremental behavioral changes. These notes may be:
- Motivational
- Informational
- Supportive
The note will be visible to the client within the app, fostering engagement and clarity.

Step 7: Create the assignment
- Click Create Assignment to finalize the process.
- The Goal will now appear in the client’s IdentityArc Assignments Dashboard, where its status can be monitored.

Result
Once assigned:
- The Goal appears in the IdentityArc dashboard within the Client Toolkit.
- Service providers can monitor progress and completion status.
- The client can view the Goal and any associated notes in the mobile app, encouraging accountability and engagement.
- The Goal contributes to measurable progress toward long-term Challenges.
Tips / Best Practices
- Align Goals with active Challenges to maintain a cohesive care plan.
- Set realistic and attainable timelines based on the client’s readiness.
- Use supportive notes to motivate and guide clients through the app.
- Regularly review Goal progress to ensure continued relevance and effectiveness.
- Ensure the Identity Arc library is configured before assigning Goals.
Related Articles
- What is Identity Arc?
- How Goals, Tasks, and Challenges Work Together
- How to Assign a Challenge to a Client
- How to Assign a Task to a Client
Need more help?
If you need assistance assigning Goals or configuring your Identity Arc library, please contact your Organization Administrator or reach out to our Support Team through the in-platform chat and select “Report an issue.”